The holiday season just isn't complete without a touch of nostalgia, and for many, that means indulging in the iconic Little Debbie Christmas Tree Cakes. That signature combination of soft cake, creamy filling, and delightful candy coating brings back a flood of cherished childhood memories. But what if you could recreate that magic right in your own kitchen? Get ready to bake some festive joy because we're sharing an easy Christmas tree cake recipe that perfectly captures the spirit and taste of your favorite holiday treat!
Forget complicated baking projects. This copycat recipe is designed to be straightforward and fun, making it accessible even for novice bakers. Imagine soft, tender cake layers sandwiching a luscious marshmallow cream, all enrobed in a crisp white candy shell and adorned with festive sprinkles. It’s a delightful homemade classic that's perfect for holiday parties, cookie exchanges, or simply enjoying with a cup of cocoa by the fire. Let's dive into how you can bring this beloved holiday tradition to life with an easy Christmas tree cake recipe.
Why Make Your Own Easy Christmas Tree Cakes?
Beyond the sheer joy of baking, there are several compelling reasons to try your hand at this easy Christmas tree cake recipe:
- Nostalgia Factor: There’s nothing quite like biting into a treat that transports you back to simpler times. This homemade version evokes that exact feeling, often tasting even better than the original thanks to fresh, quality ingredients.
- Customization Galore: While we aim for a classic copycat, making them at home gives you the freedom to customize! Want a different color candy coating? More sprinkles? A touch of peppermint extract in the filling? The possibilities are endless.
- Impress Your Guests: Bringing a platter of these adorable, homemade Christmas tree cakes to a gathering is sure to elicit "oohs" and "aahs." They look festive and intricate, but as you'll see, they're surprisingly simple to achieve.
- Fun Family Activity: This recipe is perfect for involving kids in the kitchen, especially during the decorating phase. It’s a wonderful way to create holiday memories together.
- Ingredient Control: You know exactly what goes into each bite, allowing you to choose high-quality ingredients and avoid unwanted additives.
While a Simple Brown Sugar Christmas Tree Cake: No Decorating Skills might be perfect for those who prefer a Bundt pan or simpler decor, our recipe focuses on recreating the iconic Little Debbie shape and taste with minimal fuss.
Gathering Your Ingredients for Christmas Tree Magic
Crafting this delightful easy Christmas tree cake requires a few key components for both the moist cake, the creamy filling, and the festive decoration. For the best results, ensure all cold ingredients are at room temperature. This is crucial for proper emulsification and a smooth batter and frosting.
The Perfectly Moist Cake Base
Our cake layers are designed to be tender and slightly dense, providing the perfect foundation for our festive trees.
- 1 1/4 cups all-purpose flour: The structural backbone of our cake.
- 1 tsp. baking powder: Provides lift and tenderness.
- 1/4 tsp. salt: Balances the sweetness and enhances flavor.
- 1/2 cup unsalted butter, room temperature: Essential for a rich flavor and tender crumb. Room temperature butter creams beautifully with sugar.
- 1 cup sugar: For sweetness and moisture.
- 2 eggs, room temperature: Binds the ingredients, adds richness and moisture. Room temperature eggs emulsify better with the butter and sugar.
- 2 1/2 tsp. vanilla extract: The primary flavor enhancer. Don't skimp on good quality vanilla!
- 1/2 cup buttermilk, room temperature: Contributes to a wonderfully moist crumb and adds a subtle tang that perfectly complements the sweetness. If you don't have buttermilk, you can make a substitute by adding 1/2 tablespoon of lemon juice or white vinegar to regular milk and letting it sit for 5-10 minutes.
Cloud-Like Marshmallow Filling
The signature marshmallow filling is what truly sets this copycat apart – it's light, sweet, and utterly irresistible.
- 1 cup unsalted butter, room temperature: Provides richness and body to the filling.
- 1 cup Marshmallow Fluff: The star ingredient, giving that distinct marshmallow flavor and texture.
- 3 cups confectioner’s sugar: Sweetens and thickens the frosting to a spreadable consistency.
- 2 tsp. vanilla extract: Enhances the sweet, creamy flavor.
The Signature Candy Coating & Festive Flair
This is where our cakes transform into those iconic Christmas trees!
- 2 1/2 cups white candy melts: Our secret to that smooth, crisp, and quick-setting white coating.
- 3 Tbsp. coconut oil: Helps thin the candy melts, making them easier to dip and ensuring a smooth, glossy finish without altering the taste.
- 1/2 cup confectioner’s sugar: For the classic white "frosting" squiggle.
- 1-2 tsp. water (more if needed): To create a thin, pipeable glaze from the confectioner's sugar.
- 1 Tbsp. green sugar sprinkles: The quintessential Christmas tree decoration.
- 1-2 drops red food dye: For the little red dots, if desired, adding a pop of color.
Step-by-Step Guide to Your Easy Christmas Tree Cake Recipe
Making this easy Christmas tree cake recipe is a rewarding experience, leading to truly delicious and festive treats. Follow these detailed steps carefully for the best possible outcome.
Preparing the Tender Cake Layers
- Preheat & Prepare: Preheat your oven to 350°F (175°C). Line two 1/4 cookie sheet pans with parchment paper and lightly grease them with non-stick spray. If you are using one standard 1/2 sheet pan, prepare it similarly.
- Whisk Dry Ingredients: In a medium bowl, whisk together the all-purpose flour, baking powder, and salt until thoroughly combined. Set this dry mixture aside.
- Cream Butter & Sugar: In a separate, larger bowl, use an electric mixer to beat the room temperature unsalted butter and granulated sugar together. Beat for 3-5 minutes until the mixture is light, fluffy, and significantly paler in color. This creaming process incorporates air, leading to a tender cake.
- Add Wet Ingredients: Add the eggs one at a time, mixing well after each addition until just incorporated. Stir in the vanilla extract, ensuring it's evenly distributed.
- Combine Wet & Dry: Alternately add the dry flour mixture and the buttermilk to the wet butter mixture, beginning and ending with the dry ingredients. Mix a little bit between each addition on low speed, being careful not to overmix the batter. Overmixing can develop the gluten too much, resulting in a tough cake. Use a silicone spatula to gently scrape down the sides and bottom of the bowl, ensuring everything is combined nice and evenly.
- Spread & Bake: Evenly distribute the prepared batter onto the lined cookie sheets. Use an offset spatula to spread the batter thinly and smoothly to the edges of each pan. Aim for an even thickness for uniform baking.
- Bake to Perfection: Bake for 10-12 minutes, or until the cake is set and springs back slightly when gently touched. The edges should be just golden brown, and the cake should not appear jiggly.
- Cool Completely: Let the cake layers cool on the baking sheets for 5-10 minutes before carefully transferring them (still on the parchment paper) to wire racks to cool completely. This is crucial for easy handling and preventing the cakes from breaking.
Crafting the Irresistible Marshmallow Filling
- Beat Butter: In a large bowl, beat the room temperature unsalted butter with an electric mixer until light and fluffy, about 2-3 minutes.
- Add Fluff & Vanilla: Add the Marshmallow Fluff and vanilla extract, beating until well combined.
- Gradually Add Sugar: Gradually add the confectioner’s sugar, about 1 cup at a time, beating on low speed until incorporated, then increasing to medium-high until smooth and creamy. If the frosting seems too thick, you can add a tiny splash of milk or cream (1 teaspoon at a time) until it reaches your desired consistency.
Assembling Your Christmas Tree Cakes
- Cut Out Shapes: Once the cake layers are completely cool, use a Christmas tree-shaped cookie cutter (approximately 3-4 inches tall) to cut out individual cake shapes. You should get quite a few trees from each sheet. Carefully peel off the parchment paper.
- Fill & Stack: Place a dollop of marshmallow filling onto one cake tree. Top with another cake tree, gently pressing down to create a sandwich. Repeat with all cake cut-outs.
- Chill for Stability: For easier dipping, transfer the assembled cake sandwiches to a baking sheet lined with parchment paper and chill them in the refrigerator for at least 30 minutes, or even in the freezer for 15-20 minutes. This will firm up the filling and prevent excessive crumbling during coating.
The Festive Finishing Touches
- Prepare Candy Coating: In a microwave-safe bowl, combine the white candy melts and coconut oil. Microwave in 30-second intervals, stirring well after each, until completely smooth and melted. Be careful not to overheat. The coconut oil helps thin the mixture, making it perfect for dipping.
- Dip the Cakes: One by one, carefully dip each chilled cake tree into the melted candy coating. Use a fork or a dipping tool to fully submerge the cake, then lift it out, allowing excess coating to drip off. Place the coated cakes back onto the parchment-lined baking sheet.
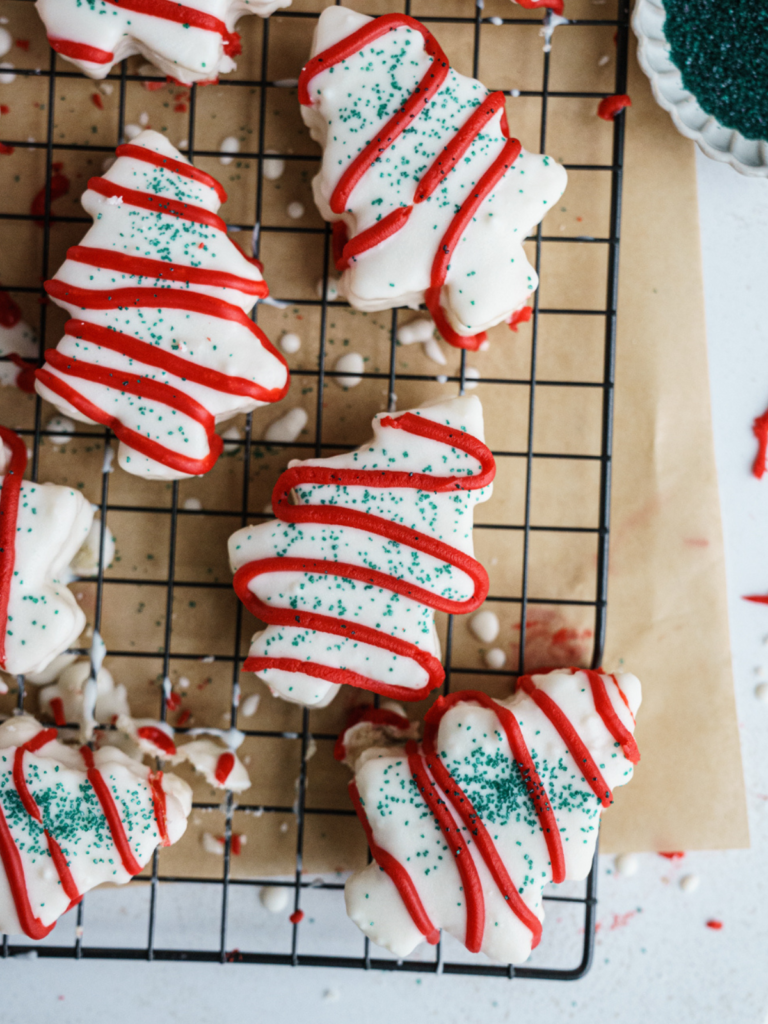
- Add Sprinkles: Immediately after dipping each cake, sprinkle it generously with green sugar sprinkles before the coating sets.
- Create Glaze for Decoration: In a small bowl, mix the 1/2 cup confectioner’s sugar with 1-2 tsp. of water until you have a thick but pipeable glaze. Transfer this glaze to a small piping bag with a very small round tip, or simply snip a tiny corner off a Ziploc bag.
- Decorate! Once the white candy coating has fully set (you can speed this up by chilling them again), pipe zigzag lines across each tree with the confectioner's sugar glaze. For the classic Little Debbie look, use a toothpick dipped in red food dye to create tiny red dots on the glaze.
Your beautiful and delicious easy Christmas tree cakes are now ready to be enjoyed! For more festive baking ideas, you might also like to Bake Your Own Easy Christmas Tree Cake for Festive Fun.
Pro Tips for Christmas Tree Cake Success
- Room Temperature is Key: We mentioned it, but it bears repeating! Cold ingredients don't emulsify well, leading to lumpy batter and split frostings. Plan ahead!
- Don't Overmix: When combining wet and dry ingredients for the cake, mix just until combined. Overmixing develops gluten, making the cake tough.
- Even Spreading: An offset spatula is your best friend for spreading the cake batter thinly and evenly on the sheet pan. This ensures uniform baking and consistent cake thickness for your trees.
- Chill, Chill, Chill: Chilling the assembled cake sandwiches before dipping is critical. It firms up the filling, makes the cakes easier to handle, and minimizes crumbs in your candy coating.
- Thin Your Coating: If your candy melts seem too thick, adding a little more coconut oil (start with a teaspoon) will help thin them to a perfect dipping consistency.
- Work Quickly with Sprinkles: The candy coating sets fast, especially on chilled cakes. Have your sprinkles ready and apply them immediately after dipping each cake.
- Storage: Store your finished Christmas tree cakes in an airtight container at room temperature for up to 3-4 days. They also freeze beautifully for up to a month – just thaw at room temperature before serving.
- Get Creative with Decoration: While we stick to the classic, feel free to experiment! Use different colored candy melts, edible glitter, or even tiny edible stars for the top of your trees.
Making your own copycat Little Debbie Christmas Tree Cakes is a rewarding way to add a personal, nostalgic touch to your holiday celebrations. This easy Christmas tree cake recipe proves that recreating beloved treats at home can be simple, fun, and incredibly delicious. So gather your ingredients, turn on some holiday tunes, and get ready to spread some serious festive cheer, one adorable Christmas tree cake at a time!
